5. 添加LVGL库,对接显示和触摸驱动
本次实验我们会融合前面实验的成果,添加LVGL库,对接显示和触摸驱动,让屏幕能显示UI、能触摸操作。
5.1 复制工程
上次实验得出的工程我们可以通过复制在原有的基础上得到一个新的工程。
> 如果你不清楚复制工程的步骤,请参考阅读第2章实验的步骤教程。
本次实验我们的项目命名为:03_dshanmcu_ra6m5_lvgl_display_touchpad
<img src="http://photos.100ask.net/renesas-docs/DShanMCU_RA6M5/lvgl_port_special_tutorial/chapter-5/chapter-5_001.png" alt="chapter-5_001" />
5.2 创建代码文件
5.2.1 添加lvgl库
在 windows的文件资源管理 中将资料包中的压缩包 2_配套源码/02_LVGL培训示例代码/lvgl-8.3.8.zip 解压到 03_dshanmcu_ra6m5_lvgl_display_touchpad/dshanmcu_ra6m5/Middlewares 目录,并将解压出来的目录重命名为 lvgl,如下图所示:
<img src="http://photos.100ask.net/renesas-docs/DShanMCU_RA6M5/lvgl_port_special_tutorial/chapter-5/chapter-5_002.png" alt="chapter-5_002" />
打开 e2stduio 可以看到自动同步了文件夹,点开 lvgl 文件夹可以看到里面的内容,如下图所示:
<img src="http://photos.100ask.net/renesas-docs/DShanMCU_RA6M5/lvgl_port_special_tutorial/chapter-5/chapter-5_003.png" alt="chapter-5_003" />
5.2.1 添加lvgl配置文件
lvgl本身内置有一个名为 lv_conf_template.h 的配置文件,对于lvgl的一些基础配置,功能裁剪都是在这里进行修改,但是这个是包含在lvgl中的文件我们不能直接对其进行修改,并且其名称后缀 _template 也表明这是一个模板,我们通过阅读lvgl库根目录下的 README_zh.md 文件,可知需要将其复制到与 lvgl 同级目录中,具体操作如下:
将 lvgl 文件夹中的 lv_conf_template.h 文件复制到上一级目录,即复制到 03_dshanmcu_ra6m5_lvgl_display_touchpad/dshanmcu_ra6m5/Middlewares 目录下,并将其重命名为 lv_conf.h (也就是将 _template 后缀去掉),如下图所示:
<img src="http://photos.100ask.net/renesas-docs/DShanMCU_RA6M5/lvgl_port_special_tutorial/chapter-5/chapter-5_004.png" alt="chapter-5_004" />
5.2.2 添加lvgl显示输出、控制输入驱动接口文件
显示、输入设备驱动的对接,lvgl也有对应的模板文件,我们可以将其复制到自定义位置,但是不能直接在lvgl库进行修改,具体操作如下:
将 lvgl/examples/porting 中的 lv_port_disp_template.c、 lv_port_disp_template.h、lv_port_indev_template.c、lv_port_indev_template.h 复制 03_dshanmcu_ra6m5_lvgl_display_touchpad/dshanmcu_ra6m5/drivers 目录中,并重命名去掉 _template 后缀,操作如下所示:
<img src="http://photos.100ask.net/renesas-docs/DShanMCU_RA6M5/lvgl_port_special_tutorial/chapter-5/chapter-5_005.png" alt="chapter-5_005" />
5.2.3 新建app_lvgl_test.c
在 03_dshanmcu_ra6m5_lvgl_display_touchpad/dshanmcu_ra6m5/applications 目录下新建名为 app_lvgl_test.c 文件,如下图所示:
<img src="http://photos.100ask.net/renesas-docs/DShanMCU_RA6M5/lvgl_port_special_tutorial/chapter-5/chapter-5_006.png" alt="chapter-5_006" />
5.3 修改接口文件对接驱动
5.3.1 修改lvgl配置文件
打开 03_dshanmcu_ra6m5_lvgl_display_touchpad/dshanmcu_ra6m5/Middlewares/lv_conf.h 文件,下面对其进行修改适配我们的工程:
- 修改第 15 行为:
#if 1 /*Set it to "1" to enable content*/
- 修改第 27 行为:
#define LV_COLOR_DEPTH 16
- 修改第 30 行为:
#define LV_COLOR_16_SWAP 1
- 修改第 282 行为:
#define LV_USE_PERF_MONITOR 1
- 修改第 731 行为:
#define LV_BUILD_EXAMPLES 0
- 修改第 738 行为:
#define LV_USE_DEMO_WIDGETS 1
5.3.2修改显示驱动接口文件(v1.1硬件)
这里的修改是为了适配 v1.1 显示屏,如果你是用的不是 v1.1 显示屏,请阅读后面小节适配 v1.2 的内容。
打开 03_dshanmcu_ra6m5_lvgl_display_touchpad/dshanmcu_ra6m5/drivers/lv_port_disp.c 文件,下面对其进行修改适配我们的工程:
- 修改第 7 行为:
#if 1
- 修改 12 行为:
#include "lv_port_disp.h"
- 在 15 行空白处添加头文件包含:
#include "drv_spi_display.h"
#include <stdio.h>
- 在 20 行空白处添加下面两行代码:
#define MY_DISP_HOR_RES    320
#define MY_DISP_VER_RES    480
- 修改
lv_port_disp_init函数为如下代码:
void lv_port_disp_init(void)
{
    /*-------------------------
     * Initialize your display
     * -----------------------*/
    disp_init();

    /*-----------------------------
     * Create a buffer for drawing
     *----------------------------*/

    /**
     * LVGL requires a buffer where it internally draws the widgets.
     * Later this buffer will passed to your display driver's `flush_cb` to copy its content to your display.
     * The buffer has to be greater than 1 display row
     *
     * There are 3 buffering configurations:
     * 1. Create ONE buffer:
     *      LVGL will draw the display's content here and writes it to your display
     *
     * 2. Create TWO buffer:
     *      LVGL will draw the display's content to a buffer and writes it your display.
     *      You should use DMA to write the buffer's content to the display.
     *      It will enable LVGL to draw the next part of the screen to the other buffer while
     *      the data is being sent form the first buffer. It makes rendering and flushing parallel.
     *
     * 3. Double buffering
     *      Set 2 screens sized buffers and set disp_drv.full_refresh = 1.
     *      This way LVGL will always provide the whole rendered screen in `flush_cb`
     *      and you only need to change the frame buffer's address.
     */

    /* Example for 1) */
    //static lv_disp_draw_buf_t draw_buf_dsc_1;
    //static lv_color_t buf_1[MY_DISP_HOR_RES * 10];                          /*A buffer for 10 rows*/
    //lv_disp_draw_buf_init(&draw_buf_dsc_1, buf_1, NULL, MY_DISP_HOR_RES * 10);   /*Initialize the display buffer*/

    /* Example for 2) */
    static lv_disp_draw_buf_t draw_buf_dsc_2;
    static lv_color_t buf_2_1[MY_DISP_HOR_RES * 10];                        /*A buffer for 10 rows*/
    static lv_color_t buf_2_2[MY_DISP_HOR_RES * 10];                        /*An other buffer for 10 rows*/
    lv_disp_draw_buf_init(&draw_buf_dsc_2, buf_2_1, buf_2_2, MY_DISP_HOR_RES * 10);   /*Initialize the display buffer*/

    /* Example for 3) also set disp_drv.full_refresh = 1 below*/
    //static lv_disp_draw_buf_t draw_buf_dsc_3;
    //static lv_color_t buf_3_1[MY_DISP_HOR_RES * MY_DISP_VER_RES];            /*A screen sized buffer*/
    //static lv_color_t buf_3_2[MY_DISP_HOR_RES * MY_DISP_VER_RES];            /*Another screen sized buffer*/
    //lv_disp_draw_buf_init(&draw_buf_dsc_3, buf_3_1, buf_3_2,
    //                      MY_DISP_VER_RES * LV_VER_RES_MAX);   /*Initialize the display buffer*/

    /*-----------------------------------
     * Register the display in LVGL
     *----------------------------------*/

    static lv_disp_drv_t disp_drv;                         /*Descriptor of a display driver*/
    lv_disp_drv_init(&disp_drv);                    /*Basic initialization*/

    /*Set up the functions to access to your display*/

    /*Set the resolution of the display*/
    disp_drv.hor_res = MY_DISP_HOR_RES;
    disp_drv.ver_res = MY_DISP_VER_RES;

    /*Used to copy the buffer's content to the display*/
    disp_drv.flush_cb = disp_flush;

    /*Set a display buffer*/
    disp_drv.draw_buf = &draw_buf_dsc_2;

    /*Required for Example 3)*/
    //disp_drv.full_refresh = 1;

    /* Fill a memory array with a color if you have GPU.
     * Note that, in lv_conf.h you can enable GPUs that has built-in support in LVGL.
     * But if you have a different GPU you can use with this callback.*/
    //disp_drv.gpu_fill_cb = gpu_fill;

    /*Finally register the driver*/
    lv_disp_drv_register(&disp_drv);
}
- 修改
disp_init函数为如下代码:
static void disp_init(void)
{
    /*You code here*/
    fsp_err_t err;

    err = drv_spi_display_init();
    if(FSP_SUCCESS != err)
    {
        printf ("%s %d\r\n", __FUNCTION__, __LINE__);
        __BKPT();
    }
}
- 修改
disp_flush函数为如下代码:
static void disp_flush(lv_disp_drv_t * disp_drv, const lv_area_t * area, lv_color_t * color_p)
{
#if 0
if(disp_flush_enabled) {
/*The most simple case (but also the slowest) to put all pixels to the screen one-by-one*/
int32_t x;
int32_t y;
for(y = area->y1; y <= area->y2; y++) {
for(x = area->x1; x <= area->x2; x++) {
/*Put a pixel to the display. For example:*/
/*put_px(x, y, *color_p)*/
color_p++;
}
}
}
#endif
if(disp_flush_enabled) {
uint32_t size = lv_area_get_width(area) * lv_area_get_height(area);
spi_display_set_window(area->x1, area->y1, area->x2, area->y2);
drv_spi_display_flush_data((uint8_t *)color_p, size * 2);
}
/*IMPORTANT!!!
*Inform the graphics library that you are ready with the flushing*/
lv_disp_flush_ready(disp_drv);
}
- 打开
03_dshanmcu_ra6m5_lvgl_display_touchpad/dshanmcu_ra6m5/drivers/lv_port_disp.h文件这里只需修改一个地方,修改第 7-10 行为:
#if 1

#ifndef LV_PORT_DISP_H
#define LV_PORT_DISP_H
5.3.3修改输入驱动接口文件(v1.1硬件)
这里的修改是为了适配 gt911 触摸屏,如果你是用的不是 gt911 触摸屏,请阅读下一小节(v1.2)适配 ft5x06 的内容。
打开 03_dshanmcu_ra6m5_lvgl_display_touchpad/dshanmcu_ra6m5/drivers/lv_port_indev.c 文件,下面对其进行修改适配我们的工程:
- 修改第 7 行为:
#if 1
- 修改 12 行为:
#include "lv_port_indev.h"
- 在 15 行空白处添加头文件包含:
#include "drv_i2c_touchpad.h"
#include <stdio.h>
- 修改
lv_port_indev_init函数为如下代码:
void lv_port_indev_init(void)
{
    /**
     * Here you will find example implementation of input devices supported by LittelvGL:
     *  - Touchpad
     *  - Mouse (with cursor support)
     *  - Keypad (supports GUI usage only with key)
     *  - Encoder (supports GUI usage only with: left, right, push)
     *  - Button (external buttons to press points on the screen)
     *
     *  The `..._read()` function are only examples.
     *  You should shape them according to your hardware
     */

    static lv_indev_drv_t indev_drv;

    /*------------------
     * Touchpad
     * -----------------*/

    /*Initialize your touchpad if you have*/
    touchpad_init();

    /*Register a touchpad input device*/
    lv_indev_drv_init(&indev_drv);
    indev_drv.type = LV_INDEV_TYPE_POINTER;
    indev_drv.read_cb = touchpad_read;
    indev_touchpad = lv_indev_drv_register(&indev_drv);

    /*------------------
     * Mouse
     * -----------------*/

    /*Initialize your mouse if you have*/
    //mouse_init();

    /*Register a mouse input device*/
    //lv_indev_drv_init(&indev_drv);
    //indev_drv.type = LV_INDEV_TYPE_POINTER;
    //indev_drv.read_cb = mouse_read;
    //indev_mouse = lv_indev_drv_register(&indev_drv);

    /*Set cursor. For simplicity set a HOME symbol now.*/
    //lv_obj_t * mouse_cursor = lv_img_create(lv_scr_act());
    //lv_img_set_src(mouse_cursor, LV_SYMBOL_HOME);
    //lv_indev_set_cursor(indev_mouse, mouse_cursor);

    /*------------------
     * Keypad
     * -----------------*/

    /*Initialize your keypad or keyboard if you have*/
    //keypad_init();

    /*Register a keypad input device*/
    //lv_indev_drv_init(&indev_drv);
    //indev_drv.type = LV_INDEV_TYPE_KEYPAD;
    //indev_drv.read_cb = keypad_read;
    //indev_keypad = lv_indev_drv_register(&indev_drv);

    /*Later you should create group(s) with `lv_group_t * group = lv_group_create()`,
     *add objects to the group with `lv_group_add_obj(group, obj)`
     *and assign this input device to group to navigate in it:
     *`lv_indev_set_group(indev_keypad, group);`*/

    /*------------------
     * Encoder
     * -----------------*/

    /*Initialize your encoder if you have*/
    //encoder_init();

    /*Register a encoder input device*/
    //lv_indev_drv_init(&indev_drv);
    //indev_drv.type = LV_INDEV_TYPE_ENCODER;
    //indev_drv.read_cb = encoder_read;
    //indev_encoder = lv_indev_drv_register(&indev_drv);

    /*Later you should create group(s) with `lv_group_t * group = lv_group_create()`,
     *add objects to the group with `lv_group_add_obj(group, obj)`
     *and assign this input device to group to navigate in it:
     *`lv_indev_set_group(indev_encoder, group);`*/

    /*------------------
     * Button
     * -----------------*/

    /*Initialize your button if you have*/
    //button_init();

    /*Register a button input device*/
    //lv_indev_drv_init(&indev_drv);
    //indev_drv.type = LV_INDEV_TYPE_BUTTON;
    //indev_drv.read_cb = button_read;
    //indev_button = lv_indev_drv_register(&indev_drv);

    /*Assign buttons to points on the screen*/
    //static const lv_point_t btn_points[2] = {
    //    {10, 10},   /*Button 0 -> x:10; y:10*/
    //    {40, 100},  /*Button 1 -> x:40; y:100*/
    //};
    //lv_indev_set_button_points(indev_button, btn_points);
}
- 修改
touchpad_init函数为如下代码:
static void touchpad_init(void)
{
    /*Your code comes here*/
    fsp_err_t err;

    err = drv_i2c_touchpad_init();
    if(FSP_SUCCESS != err)
    {
        printf ("%s %d\r\n", __FUNCTION__, __LINE__);
        __BKPT();
    }
}
- 修改
touchpad_read函数为如下代码:
static void touchpad_read(lv_indev_drv_t * indev_drv, lv_indev_data_t * data)
{
    fsp_err_t err;
    static lv_coord_t last_x = 0;
    static lv_coord_t last_y = 0;

    /*Save the pressed coordinates and the state*/
    err = touchpad_is_touched();
    if(FSP_SUCCESS == err) {
        touchpad_get_pos((uint16_t *)&last_x, (uint16_t *)&last_y, 0);
        data->state = LV_INDEV_STATE_PR;
    }
    else {
        data->state = LV_INDEV_STATE_REL;
    }

    /*Set the last pressed coordinates*/
    data->point.x = last_x;
    data->point.y = last_y;
}
- 打开
03_dshanmcu_ra6m5_lvgl_display_touchpad/dshanmcu_ra6m5/drivers/lv_port_indev.h文件这里只需修改一个地方,修改第 8 - 11 行为:
#if 1

#ifndef LV_PORT_INDEV_H
#define LV_PORT_INDEV_H
5.3.2修改显示驱动接口文件(v1.2硬件)
这里的修改是为了适配 v1.2 显示屏,如果你是用的是不是 v1.2 显示屏,请阅读上一小节适配 v1.1 的内容。
打开 03_dshanmcu_ra6m5_lvgl_display_touchpad/dshanmcu_ra6m5/drivers/lv_port_disp.c 文件,下面对其进行修改适配我们的工程:
- 修改第 7 行为:
#if 1
- 修改 12 行为:
#include "lv_port_disp.h"
- 在 15 行空白处添加头文件包含:
#include "drv_spi_display.h"
#include <stdio.h>
- 在 20 行空白处添加下面两行代码:
#define MY_DISP_HOR_RES    320
#define MY_DISP_VER_RES    480
- 修改
lv_port_disp_init函数为如下代码:
void lv_port_disp_init(void)
{
    /*-------------------------
     * Initialize your display
     * -----------------------*/
    disp_init();

    /*-----------------------------
     * Create a buffer for drawing
     *----------------------------*/

    /**
     * LVGL requires a buffer where it internally draws the widgets.
     * Later this buffer will passed to your display driver's `flush_cb` to copy its content to your display.
     * The buffer has to be greater than 1 display row
     *
     * There are 3 buffering configurations:
     * 1. Create ONE buffer:
     *      LVGL will draw the display's content here and writes it to your display
     *
     * 2. Create TWO buffer:
     *      LVGL will draw the display's content to a buffer and writes it your display.
     *      You should use DMA to write the buffer's content to the display.
     *      It will enable LVGL to draw the next part of the screen to the other buffer while
     *      the data is being sent form the first buffer. It makes rendering and flushing parallel.
     *
     * 3. Double buffering
     *      Set 2 screens sized buffers and set disp_drv.full_refresh = 1.
     *      This way LVGL will always provide the whole rendered screen in `flush_cb`
     *      and you only need to change the frame buffer's address.
     */

    /* Example for 1) */
    static lv_disp_draw_buf_t draw_buf_dsc_1;
    //static lv_color_t buf_1[MY_DISP_HOR_RES * 10];                          /*A buffer for 10 rows*/
    lv_disp_draw_buf_init(&draw_buf_dsc_1, buf_1, NULL, MY_DISP_HOR_RES * 10);   /*Initialize the display buffer*/

    /* Example for 2) */
    //static lv_disp_draw_buf_t draw_buf_dsc_2;
    //static lv_color_t buf_2_1[MY_DISP_HOR_RES * 10];                        /*A buffer for 10 rows*/
    //static lv_color_t buf_2_2[MY_DISP_HOR_RES * 10];                        /*An other buffer for 10 rows*/
    //lv_disp_draw_buf_init(&draw_buf_dsc_2, buf_2_1, buf_2_2, MY_DISP_HOR_RES * 10);   /*Initialize the display buffer*/

    /* Example for 3) also set disp_drv.full_refresh = 1 below*/
    //static lv_disp_draw_buf_t draw_buf_dsc_3;
    //static lv_color_t buf_3_1[MY_DISP_HOR_RES * MY_DISP_VER_RES];            /*A screen sized buffer*/
    //static lv_color_t buf_3_2[MY_DISP_HOR_RES * MY_DISP_VER_RES];            /*Another screen sized buffer*/
    //lv_disp_draw_buf_init(&draw_buf_dsc_3, buf_3_1, buf_3_2,
    //                      MY_DISP_VER_RES * LV_VER_RES_MAX);   /*Initialize the display buffer*/

    /*-----------------------------------
     * Register the display in LVGL
     *----------------------------------*/

    static lv_disp_drv_t disp_drv;                         /*Descriptor of a display driver*/
    lv_disp_drv_init(&disp_drv);                    /*Basic initialization*/

    /*Set up the functions to access to your display*/

    /*Set the resolution of the display*/
    disp_drv.hor_res = MY_DISP_HOR_RES;
    disp_drv.ver_res = MY_DISP_VER_RES;

    /*Used to copy the buffer's content to the display*/
    disp_drv.flush_cb = disp_flush;

    /*Set a display buffer*/
    disp_drv.draw_buf = &draw_buf_dsc_2;

    /*Required for Example 3)*/
    //disp_drv.full_refresh = 1;

    /* Fill a memory array with a color if you have GPU.
     * Note that, in lv_conf.h you can enable GPUs that has built-in support in LVGL.
     * But if you have a different GPU you can use with this callback.*/
    //disp_drv.gpu_fill_cb = gpu_fill;

    /*Finally register the driver*/
    lv_disp_drv_register(&disp_drv);
}
- 修改
disp_init函数为如下代码:
static void disp_init(void)
{
     /*You code here*/
    ptDispDev = LCDGetDevice();
    if(NULL == ptDispDev)
    {
        //printf("Failed to get LCD device!\r\n");
        return;
    }
    /* 初始化显示设备 */
    ptDispDev->Init(ptDispDev);
    /* 设置屏幕显示区域 */
    //ptDispDev->SetDisplayWindow(ptDispDev, 0, 0, ptDispDev->wXres - 1, ptDispDev->wYres - 1);
    /* 清除屏幕 */
    //memset((uint8_t*)ptDispDev->FBBase, 0x00, ptDispDev->dwSize);
    //ptDispDev->Flush(ptDispDev);
}
- 修改
disp_flush函数为如下代码:
static void disp_flush(lv_disp_drv_t * disp_drv, const lv_area_t * area, lv_color_t * color_p)
{
#if 1
//DisplayDevice *ptDispDev = LCDGetDevice();
if(disp_flush_enabled) {
/*The most simple case (but also the slowest) to put all pixels to the screen one-by-one*/
//int32_t x;
//int32_t y;
//for(y = area->y1; y <= area->y2; y++) {
// for(x = area->x1; x <= area->x2; x++) {
// /*Put a pixel to the display. For example:*/
// /*put_px(x, y, *color_p)*/
// ptDispDev->SetPixel(ptDispDev, (unsigned short)x, (unsigned short)y, color_p);
// color_p++;
// }
//}
uint32_t size = lv_area_get_width(area) * lv_area_get_height(area);
ptDispDev->SetDisplayWindow(ptDispDev, (unsigned short)area->x1, (unsigned short)area->y1, (unsigned short)area->x2, (unsigned short)area->y2);
ptDispDev->Flush(ptDispDev, color_p, size * 2);
}
#endif
/*IMPORTANT!!!
*Inform the graphics library that you are ready with the flushing*/
lv_disp_flush_ready(disp_drv);
}
- 打开
03_dshanmcu_ra6m5_lvgl_display_touchpad/dshanmcu_ra6m5/drivers/lv_port_disp.h文件这里只需修改一个地方,修改第 7-10 行为:
#if 1

#ifndef LV_PORT_DISP_H
#define LV_PORT_DISP_H
5.3.3 修改输入驱动接口文件(v1.2硬件)
这里的修改是为了适配 ft5x06 触摸屏,如果你是用的不是 ft5x06 触摸屏,请阅读上一小节(v1.1)适配 gt911 的内容。
打开 03_dshanmcu_ra6m5_lvgl_display_touchpad/dshanmcu_ra6m5/drivers/lv_port_indev.c 文件,下面对其进行修改适配我们的工程:
- 修改第 7 行为:
#if 1
- 修改 12 行为:
#include "lv_port_indev.h"
- 在 15 行空白处添加头文件包含:
#include "drv_i2c_touchpad.h"
#include <stdio.h>
- 修改
lv_port_indev_init函数为如下代码:
void lv_port_indev_init(void)
{
    /**
     * Here you will find example implementation of input devices supported by LittelvGL:
     *  - Touchpad
     *  - Mouse (with cursor support)
     *  - Keypad (supports GUI usage only with key)
     *  - Encoder (supports GUI usage only with: left, right, push)
     *  - Button (external buttons to press points on the screen)
     *
     *  The `..._read()` function are only examples.
     *  You should shape them according to your hardware
     */

    static lv_indev_drv_t indev_drv;

    /*------------------
     * Touchpad
     * -----------------*/

    /*Initialize your touchpad if you have*/
    touchpad_init();

    /*Register a touchpad input device*/
    lv_indev_drv_init(&indev_drv);
    indev_drv.type = LV_INDEV_TYPE_POINTER;
    indev_drv.read_cb = touchpad_read;
    indev_touchpad = lv_indev_drv_register(&indev_drv);

    /*------------------
     * Mouse
     * -----------------*/

    /*Initialize your mouse if you have*/
    //mouse_init();

    /*Register a mouse input device*/
    //lv_indev_drv_init(&indev_drv);
    //indev_drv.type = LV_INDEV_TYPE_POINTER;
    //indev_drv.read_cb = mouse_read;
    //indev_mouse = lv_indev_drv_register(&indev_drv);

    /*Set cursor. For simplicity set a HOME symbol now.*/
    //lv_obj_t * mouse_cursor = lv_img_create(lv_scr_act());
    //lv_img_set_src(mouse_cursor, LV_SYMBOL_HOME);
    //lv_indev_set_cursor(indev_mouse, mouse_cursor);

    /*------------------
     * Keypad
     * -----------------*/

    /*Initialize your keypad or keyboard if you have*/
    //keypad_init();

    /*Register a keypad input device*/
    //lv_indev_drv_init(&indev_drv);
    //indev_drv.type = LV_INDEV_TYPE_KEYPAD;
    //indev_drv.read_cb = keypad_read;
    //indev_keypad = lv_indev_drv_register(&indev_drv);

    /*Later you should create group(s) with `lv_group_t * group = lv_group_create()`,
     *add objects to the group with `lv_group_add_obj(group, obj)`
     *and assign this input device to group to navigate in it:
     *`lv_indev_set_group(indev_keypad, group);`*/

    /*------------------
     * Encoder
     * -----------------*/

    /*Initialize your encoder if you have*/
    //encoder_init();

    /*Register a encoder input device*/
    //lv_indev_drv_init(&indev_drv);
    //indev_drv.type = LV_INDEV_TYPE_ENCODER;
    //indev_drv.read_cb = encoder_read;
    //indev_encoder = lv_indev_drv_register(&indev_drv);

    /*Later you should create group(s) with `lv_group_t * group = lv_group_create()`,
     *add objects to the group with `lv_group_add_obj(group, obj)`
     *and assign this input device to group to navigate in it:
     *`lv_indev_set_group(indev_encoder, group);`*/

    /*------------------
     * Button
     * -----------------*/

    /*Initialize your button if you have*/
    //button_init();

    /*Register a button input device*/
    //lv_indev_drv_init(&indev_drv);
    //indev_drv.type = LV_INDEV_TYPE_BUTTON;
    //indev_drv.read_cb = button_read;
    //indev_button = lv_indev_drv_register(&indev_drv);

    /*Assign buttons to points on the screen*/
    //static const lv_point_t btn_points[2] = {
    //    {10, 10},   /*Button 0 -> x:10; y:10*/
    //    {40, 100},  /*Button 1 -> x:40; y:100*/
    //};
    //lv_indev_set_button_points(indev_button, btn_points);
}
- 修改
touchpad_init函数为如下代码:
static void touchpad_init(void)
{
      /*Your code comes here*/
    ptDev = TouchDevGet();
    if(NULL == ptDev)
    {
        //printf("Error. Not Found Touch Device!\r\n");
        return;
    }

    ptDev->Init(ptDev);
}
- 修改
touchpad_read函数为如下代码:
static void touchpad_read(lv_indev_drv_t * indev_drv, lv_indev_data_t * data)
{
    static lv_coord_t last_x = 0;
    static lv_coord_t last_y = 0;

    /*Save the pressed coordinates and the state*/
    if(ptDev->Read(ptDev, &last_x, &last_y) == true)
    {
        data->state = LV_INDEV_STATE_PR;
    }
    else {
        data->state = LV_INDEV_STATE_REL;
    }

    /*Set the last pressed coordinates*/
    data->point.x = last_x;
    data->point.y = last_y;
}
- 打开
03_dshanmcu_ra6m5_lvgl_display_touchpad/dshanmcu_ra6m5/drivers/lv_port_indev.h文件这里只需修改一个地方,修改第 8 - 11 行为:
#if 1

#ifndef LV_PORT_INDEV_H
#define LV_PORT_INDEV_H
5.4 配置FSP
这里的配置主要是为lvgl提供心跳支持。
5.4.1 添加 Stacks(r_gpt)
- 打开
FSP Configuration视图:双击项目文件夹中的configuration.xml文件。 - 按照下图所示,添加
r_gpt模块:
<img src="http://photos.100ask.net/renesas-docs/DShanMCU_RA6M5/lvgl_port_special_tutorial/chapter-5/chapter-5_007.png" alt="chapter-5_007" />
点击刚刚添加的 r_gpt 在底部窗口的 Properties 选项卡中对其进行配置,将其配置为与下图一致:
- Name: g_timer0
- Channel: 0
- period:1
- Callback: periodic_timer0_cb
<img src="http://photos.100ask.net/renesas-docs/DShanMCU_RA6M5/lvgl_port_special_tutorial/chapter-5/chapter-5_008.png" alt="chapter-5_008" />
5.4.2 添加r_gpt 使用驱动代码
在 03_dshanmcu_ra6m5_lvgl_display_touchpad/dshanmcu_ra6m5/drivers 目录中新建 drv_gpt_timer.c 和 drv_gpt_timer.h 两个文件:
<img src="http://photos.100ask.net/renesas-docs/DShanMCU_RA6M5/lvgl_port_special_tutorial/chapter-5/chapter-5_009.png" alt="chapter-5_009" />
创建之后,先打开 drv_gpt_timer.c,添加如下代码:
/***********************************************************************************************************************
* Includes
**********************************************************************************************************************/
#include "drv_gpt_timer.h"
#include "lvgl.h"
#include <stdio.h>
/**********************************************************************************************************************
* Macro definitions
**********************************************************************************************************************/
/**********************************************************************************************************************
* Typedef definitions
**********************************************************************************************************************/
/***********************************************************************************************************************
* Private function prototypes
**********************************************************************************************************************/
static fsp_err_t gpt_timer_init(gpt_instance_ctrl_t * p_timer_ctrl, const timer_cfg_t * p_timer_cfg);
/***********************************************************************************************************************
* Private global variables
**********************************************************************************************************************/
/***********************************************************************************************************************
* Functions
**********************************************************************************************************************/
fsp_err_t drv_gpt_timer_init(void)
{
fsp_err_t err;
/* Start GPT timer to 'Give' Semaphore periodically at 1sec for semaphore_task */
err = gpt_timer_init(&g_timer0_ctrl, &g_timer0_cfg );
if(FSP_SUCCESS != err)
{
printf ("%s %d\r\n", __FUNCTION__, __LINE__);
}
return err;
}
void periodic_timer0_cb(timer_callback_args_t *p_args)
{
FSP_PARAMETER_NOT_USED(p_args);
lv_tick_inc(1);
}
static fsp_err_t gpt_timer_init(gpt_instance_ctrl_t * p_timer_ctrl, const timer_cfg_t * p_timer_cfg)
{
fsp_err_t fsp_err = FSP_SUCCESS;
/* Open GPT timer instance */
fsp_err = R_GPT_Open(p_timer_ctrl, p_timer_cfg);
/* Handle error */
if ( FSP_SUCCESS != fsp_err )
{
/* Print out in case of error */
//APP_ERR_PRINT ("\r\nGPT Timer open API failed\r\n");
return fsp_err;
}
/* Start GPT Timer instance */
fsp_err = R_GPT_Start(p_timer_ctrl);
/* Handle error */
if (FSP_SUCCESS != fsp_err)
{
/* Close timer if failed to start */
if ( FSP_SUCCESS != R_GPT_Close(p_timer_ctrl) )
{
/* Print out in case of error */
//APP_ERR_PRINT ("\r\nGPT Timer Close API failed\r\n");
}
// APP_ERR_PRINT ("\r\nGPT Timer Start API failed\r\n");
return fsp_err;
}
return fsp_err;
}
/***********************************************************************************************************************
* Private Functions
**********************************************************************************************************************/
打开 drv_gpt_timer.h,添加如下代码:
#ifndef DRV_GPT_TIMER_H
#define DRV_GPT_TIMER_H

/***********************************************************************************************************************
 * Includes
 **********************************************************************************************************************/
#include "hal_data.h"
#include <stdio.h>

/**********************************************************************************************************************
 * Macro definitions
 **********************************************************************************************************************/

/**********************************************************************************************************************
 * Typedef definitions
 **********************************************************************************************************************/

/***********************************************************************************************************************
 * Exported global variables
 **********************************************************************************************************************/

/***********************************************************************************************************************
 * Exported global functions (to be accessed by other files)
 **********************************************************************************************************************/
fsp_err_t drv_gpt_timer_init(void);

#endif /*DRV_GPT_TIMER_H*/
5.5 编写 app 程序
打开 03_dshanmcu_ra6m5_lvgl_display_touchpad/dshanmcu_ra6m5/applications/app_lvgl_test.c 文件 , 添加如下代码:
/***********************************************************************************************************************
* Includes
**********************************************************************************************************************/
#include "app.h"
#include "drv_uart.h"
#include "drv_gpt_timer.h"
#include "lv_port_disp.h"
#include "lv_port_indev.h"
#include "lvgl.h"
#include "lvgl/demos/lv_demos.h"
#include <stdio.h>
/**********************************************************************************************************************
* Macro definitions
**********************************************************************************************************************/
/**********************************************************************************************************************
* Typedef definitions
**********************************************************************************************************************/
/***********************************************************************************************************************
* Private function prototypes
**********************************************************************************************************************/
/***********************************************************************************************************************
* Private global variables
**********************************************************************************************************************/
/***********************************************************************************************************************
* Functions
**********************************************************************************************************************/
void app_lvgl_test(void)
{
fsp_err_t err;
err = drv_uart_init();
if(FSP_SUCCESS != err) __BKPT();
err = drv_gpt_timer_init();
if(FSP_SUCCESS != err)
{
printf ("%s %d\r\n", __FUNCTION__, __LINE__);
__BKPT();
}
lv_init();
lv_port_disp_init();
lv_port_indev_init();
/* create lvgl demo */
lv_demo_widgets();
while(1)
{
lv_task_handler();
R_BSP_SoftwareDelay(5, BSP_DELAY_UNITS_MILLISECONDS); // delay 5ms
}
}
/***********************************************************************************************************************
* Private Functions
**********************************************************************************************************************/
打开 03_dshanmcu_ra6m5_lvgl_display_touchpad/dshanmcu_ra6m5/applications/app.h 文件 , 在31行添加函数声明:
void app_lvgl_test(void);
打开 03_dshanmcu_ra6m5_lvgl_display_touchpad/dshanmcu_ra6m5/src/hal_entry.c 将 hal_entry 函数修改为如下所示的代码:
void hal_entry(void)
{
    /* TODO: add your own code here */
    //app_uart_test();
    //app_i2c_touchpad_test();
    //app_spi_display_test();
    app_lvgl_test();

#if BSP_TZ_SECURE_BUILD
    /* Enter non-secure code */
    R_BSP_NonSecureEnter();
#endif
}
5.6 解决编译问题
5.6.1 编译报错问题
此时如果点击编译,会发现编译报错,报错信息如下:
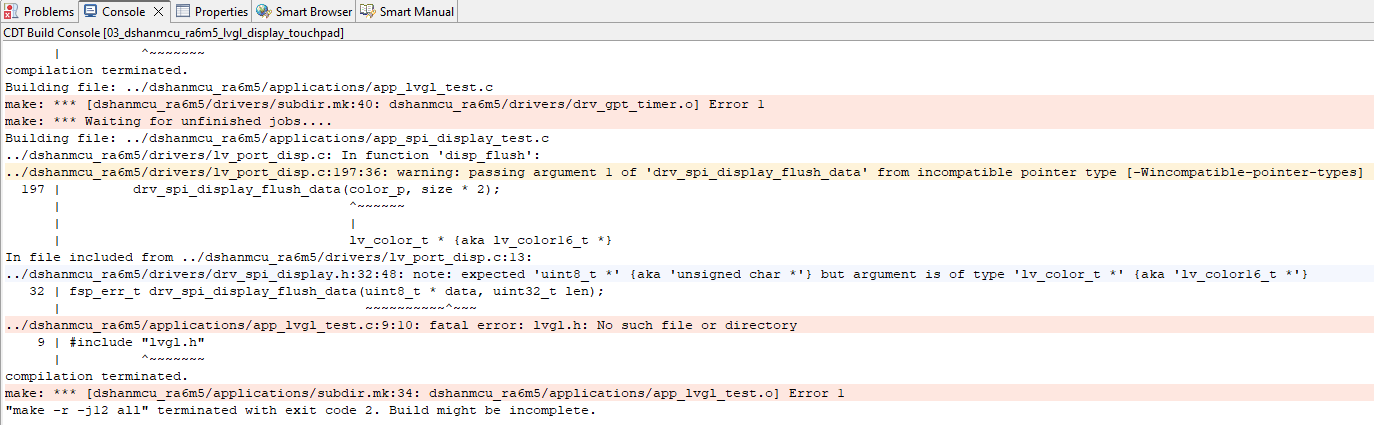
这是提示 lvgl.h 找不到,因为之前的头文件检索只到了
03_dshanmcu_ra6m5_lvgl_display_touchpad/dshanmcu_ra6m5/Middlewares 如果不想修改头文件检索范围,可以在报错的地方修改为 #include "lvgl/lvgl.h",为了避免后续更多不必要的问题,最好修改一下头文件检索范围,操作如下:
- 打开
C/C++ Project Settings,按照下图操作进入配置页面:
<img src="http://photos.100ask.net/renesas-docs/DShanMCU_RA6M5/lvgl_port_special_tutorial/chapter-5/chapter-5_011.png" alt="chapter-5_011" />
- 在配置页面中,按如下操作添加 /${ProjName}/dshanmcu_ra6m5/Middlewares/lvgl :
<img src="http://photos.100ask.net/renesas-docs/DShanMCU_RA6M5/lvgl_port_special_tutorial/chapter-5/chapter-5_012.png" alt="chapter-5_012" />
5.6.2 编译警告过多问题
解决报错问题之后,编译会发现没有报错了,编译能顺利完成,但是编译过程产生的警告非常多,如下图所示:
<img src="http://photos.100ask.net/renesas-docs/DShanMCU_RA6M5/lvgl_port_special_tutorial/chapter-5/chapter-5_013.png" alt="chapter-5_013" />
我们再次进入 C/C++ Project Settings,解决编译警告,在配置页面中,按如下操作添加 warning flags:
-Wno-conversion -Wno-aggregate-return -Wno-type-limits -Wno-unused-parameter -Wno-unused-function
<img src="http://photos.100ask.net/renesas-docs/DShanMCU_RA6M5/lvgl_port_special_tutorial/chapter-5/chapter-5_014.png" alt="chapter-5_014" />
按照上图配置之后再次点击编译,会发现编译警告都没有了,并且编译花费的时间也大大提高:
<img src="http://photos.100ask.net/renesas-docs/DShanMCU_RA6M5/lvgl_port_special_tutorial/chapter-5/chapter-5_015.png" alt="chapter-5_015" />
5.7 验证效果
点击编译按钮,再点击 debug 按钮,将程序烧写到开发板中。会看到屏幕亮起一个漂亮的UI界面,并且可以通过点击触摸屏进行交互。
<center>本节完</center>
<div></div>