I2C
I²C 是一种由 Philips(现 NXP) 在 1980 年代开发的 同步、串行、半双工、双线通信总线,主要用于芯片间短距离通信。 它常见于嵌入式系统中,用来连接微控制器与各种外围器件(传感器、存储器、显示器驱动芯片等)。
I²C 的最大特点是:
- 只需要两根信号线:
- SCL(Serial Clock Line) —— 时钟线
- SDA(Serial Data Line) —— 数据线
- 总线型结构,多个设备可共享一条总线。
- 支持多主机/多从机模式,但常见的应用是一主多从。
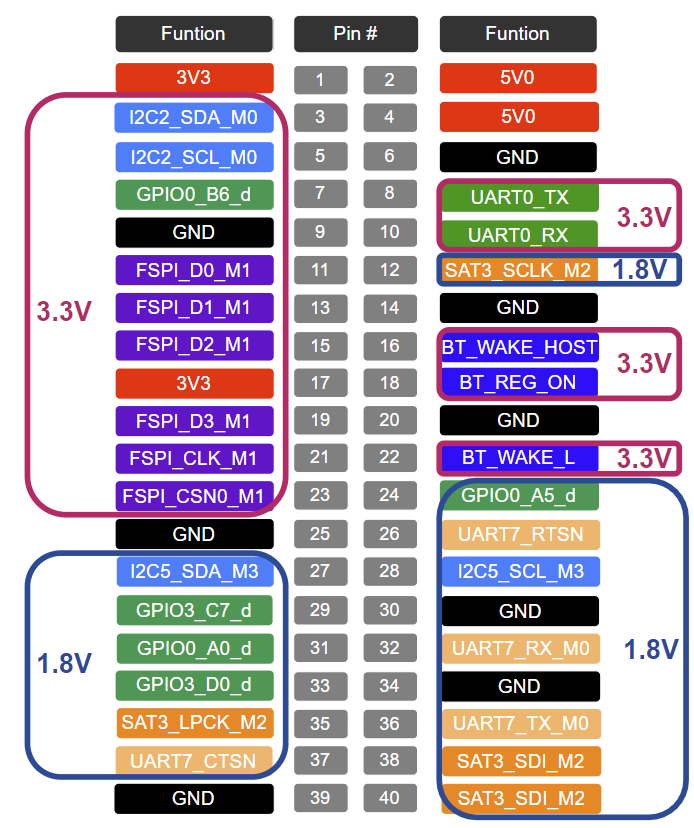
1.引脚分布
在板子上拥有40Pin的拓展引脚,你可以通过下图所示的硬件接口图进行确定,更多详细功能可以通过硬件原理图确定。
注意:如果模块的接收电压是3V3请接入3V3,如果模块的接收电压是1V8请接入1V8。禁止将1V8的模块接入3V3的引脚,会导致模块烧毁!
3.使用 sysfs 接口查看
查看 I²C 适配器(控制器)
ls /dev/i2c-*
运行效果如下:
baiwen@dshanpi-a1:~$ ls /dev/i2c-*
/dev/i2c-1  /dev/i2c-10  /dev/i2c-11  /dev/i2c-2  /dev/i2c-4  /dev/i2c-5  /dev/i2c-9
查看 I²C 总线信息:
cat /sys/class/i2c-dev/i2c-2/name
运行效果如下:
baiwen@dshanpi-a1:~$ cat /sys/class/i2c-dev/i2c-2/name
rk3x-i2c
4.使用i2c-tools工具
安装工具
sudo apt-get install i2c-tools
列出所有 I²C 总线
i2cdetect -l
运行效果:
baiwen@dshanpi-a1:~$ i2cdetect -l
i2c-1   unknown         rk3x-i2c                                N/A
i2c-2   unknown         rk3x-i2c                                N/A
i2c-4   unknown         rk3x-i2c                                N/A
i2c-5   unknown         rk3x-i2c                                N/A
i2c-9   unknown         rk3x-i2c                                N/A
i2c-10  unknown         ddc                                     N/A
i2c-11  unknown         27e40000.dp                             N/A
扫描总线上的设备
sudo i2cdetect -y -r 2
运行效果:
baiwen@dshanpi-a1:~$ sudo i2cdetect -y -r 2
     0  1  2  3  4  5  6  7  8  9  a  b  c  d  e  f
00:                         -- -- -- -- -- -- -- --
10: -- -- -- -- -- -- -- -- -- -- -- -- -- -- -- --
20: -- -- -- -- -- -- -- -- -- -- -- -- -- -- -- --
30: -- -- -- -- -- -- -- -- -- -- -- -- -- -- -- --
40: -- -- -- -- -- -- -- -- -- -- -- -- -- -- -- --
50: -- -- -- -- -- -- -- -- -- -- -- -- -- -- -- --
60: -- -- -- -- -- -- -- -- 68 -- -- -- -- -- -- --
70: -- -- -- -- -- -- -- --
5.使用Python进行I2C通讯
安装python3-smbus库
sudo apt-get install python3-smbus
示例程序:
import smbus

DEVICE_ADDR   = 0x68   # 从机地址
REGISTER_ADDR = 0x01   # 要读写的寄存器地址

# 打开 I2C 总线 2 (/dev/i2c-2)
bus = smbus.SMBus(2)

# 写寄存器:向 0x01 写入 0x55
bus.write_byte_data(DEVICE_ADDR, REGISTER_ADDR, 0x55)
print("已写入 0x55")

# 读寄存器:从 0x01 读取 1 个字节
value = bus.read_byte_data(DEVICE_ADDR, REGISTER_ADDR)
print(f"寄存器 0x{REGISTER_ADDR:02X} 的值 = 0x{value:02X}")

# 关闭总线
bus.close()
运行程序:
sudo python3 i2c.py
运行效果:
baiwen@dshanpi-a1:~$ sudo python3 i2c.py
已写入 0x55
寄存器 0x01 的值 = 0x55
6.使用C进行I2C通讯
示例代码:
#include <stdio.h>
#include <stdlib.h>
#include <fcntl.h>
#include <unistd.h>
#include <linux/i2c-dev.h>
#include <sys/ioctl.h>
#define I2C_DEV "/dev/i2c-2" // I2C 总线设备节点
#define DEV_ADDR 0x68 // 从机地址
int main() {
int fd;
char reg = 0x01; // 寄存器地址
char buf[10];
// 打开 I2C 设备
if ((fd = open(I2C_DEV, O_RDWR)) < 0) {
perror("打开 I2C 设备失败");
exit(1);
}
// 指定从机地址
if (ioctl(fd, I2C_SLAVE, DEV_ADDR) < 0) {
perror("设置 I2C 从机地址失败");
close(fd);
exit(1);
}
// 写寄存器(例如:向 0x01 写入 0x55)
buf[0] = reg; // 寄存器地址
buf[1] = 0x55; // 要写的数据
if (write(fd, buf, 2) != 2) {
perror("写寄存器失败");
} else {
printf("已向寄存器 0x%02X 写入 0x%02X\n", reg, buf[1]);
}
// 读寄存器
if (write(fd, ®, 1) != 1) {
perror("写寄存器地址失败");
} else {
if (read(fd, buf, 1) != 1) {
perror("读取寄存器失败");
} else {
printf("寄存器 0x%02X 的值 = 0x%02X\n", reg, buf[0]);
}
}
close(fd);
return 0;
}
编译程序:
gcc i2c_test.c -o i2c_test
运行程序:
sudo ./i2c_test
运行效果:
baiwen@dshanpi-a1:~$ sudo ./i2c_test
已向寄存器 0x01 写入 0x55
寄存器 0x01 的值 = 0x55