GPIO
GPIO(General Purpose Input/Output)就是芯片上可以 “自己决定当输入还是当输出” 的通用管脚。
- 输出 → 输出高/低电平,点灯、继电器、蜂鸣器。
- 输入 → 读取高/低电平,按键、红外、传感器信号。
- 可编程 → 通过寄存器或库函数随时切换方向、电平、中断。
每个 SoC/单片机都有几十个甚至上百个 GPIO,是硬件世界与软件世界最直接的“握手口”。
1.命名规则
Rockchip 采用 “bank + port + index” 三段式命名:
GPIO<bank>_<port><index>
- bank:
0~4 → 对应 gpio0~4 - port:A=0, B=1, C=2, D=3
- index:0~7
1.把名字换成全局编号(sysfs 或 kernel 用),公式:
global = bank × 32 + port × 8 + index
举例:GPIO0_B6
0 × 32 + 1 × 8 + 6 = 14 --> /sys/class/gpio/gpio14
2.把名字换成 libgpiod库中 的 line offset定义:
libgpiod 以 每个控制器为 1 个 chip,因此:
- chip 名称:
gpio0 - line offset:就是
port × 8 + index=1 × 8 + 6 = 14
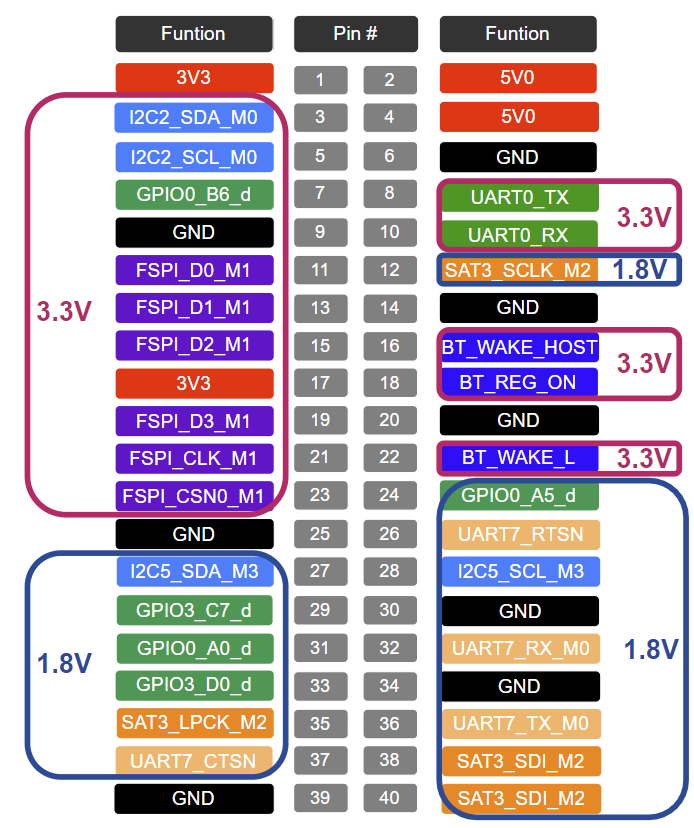
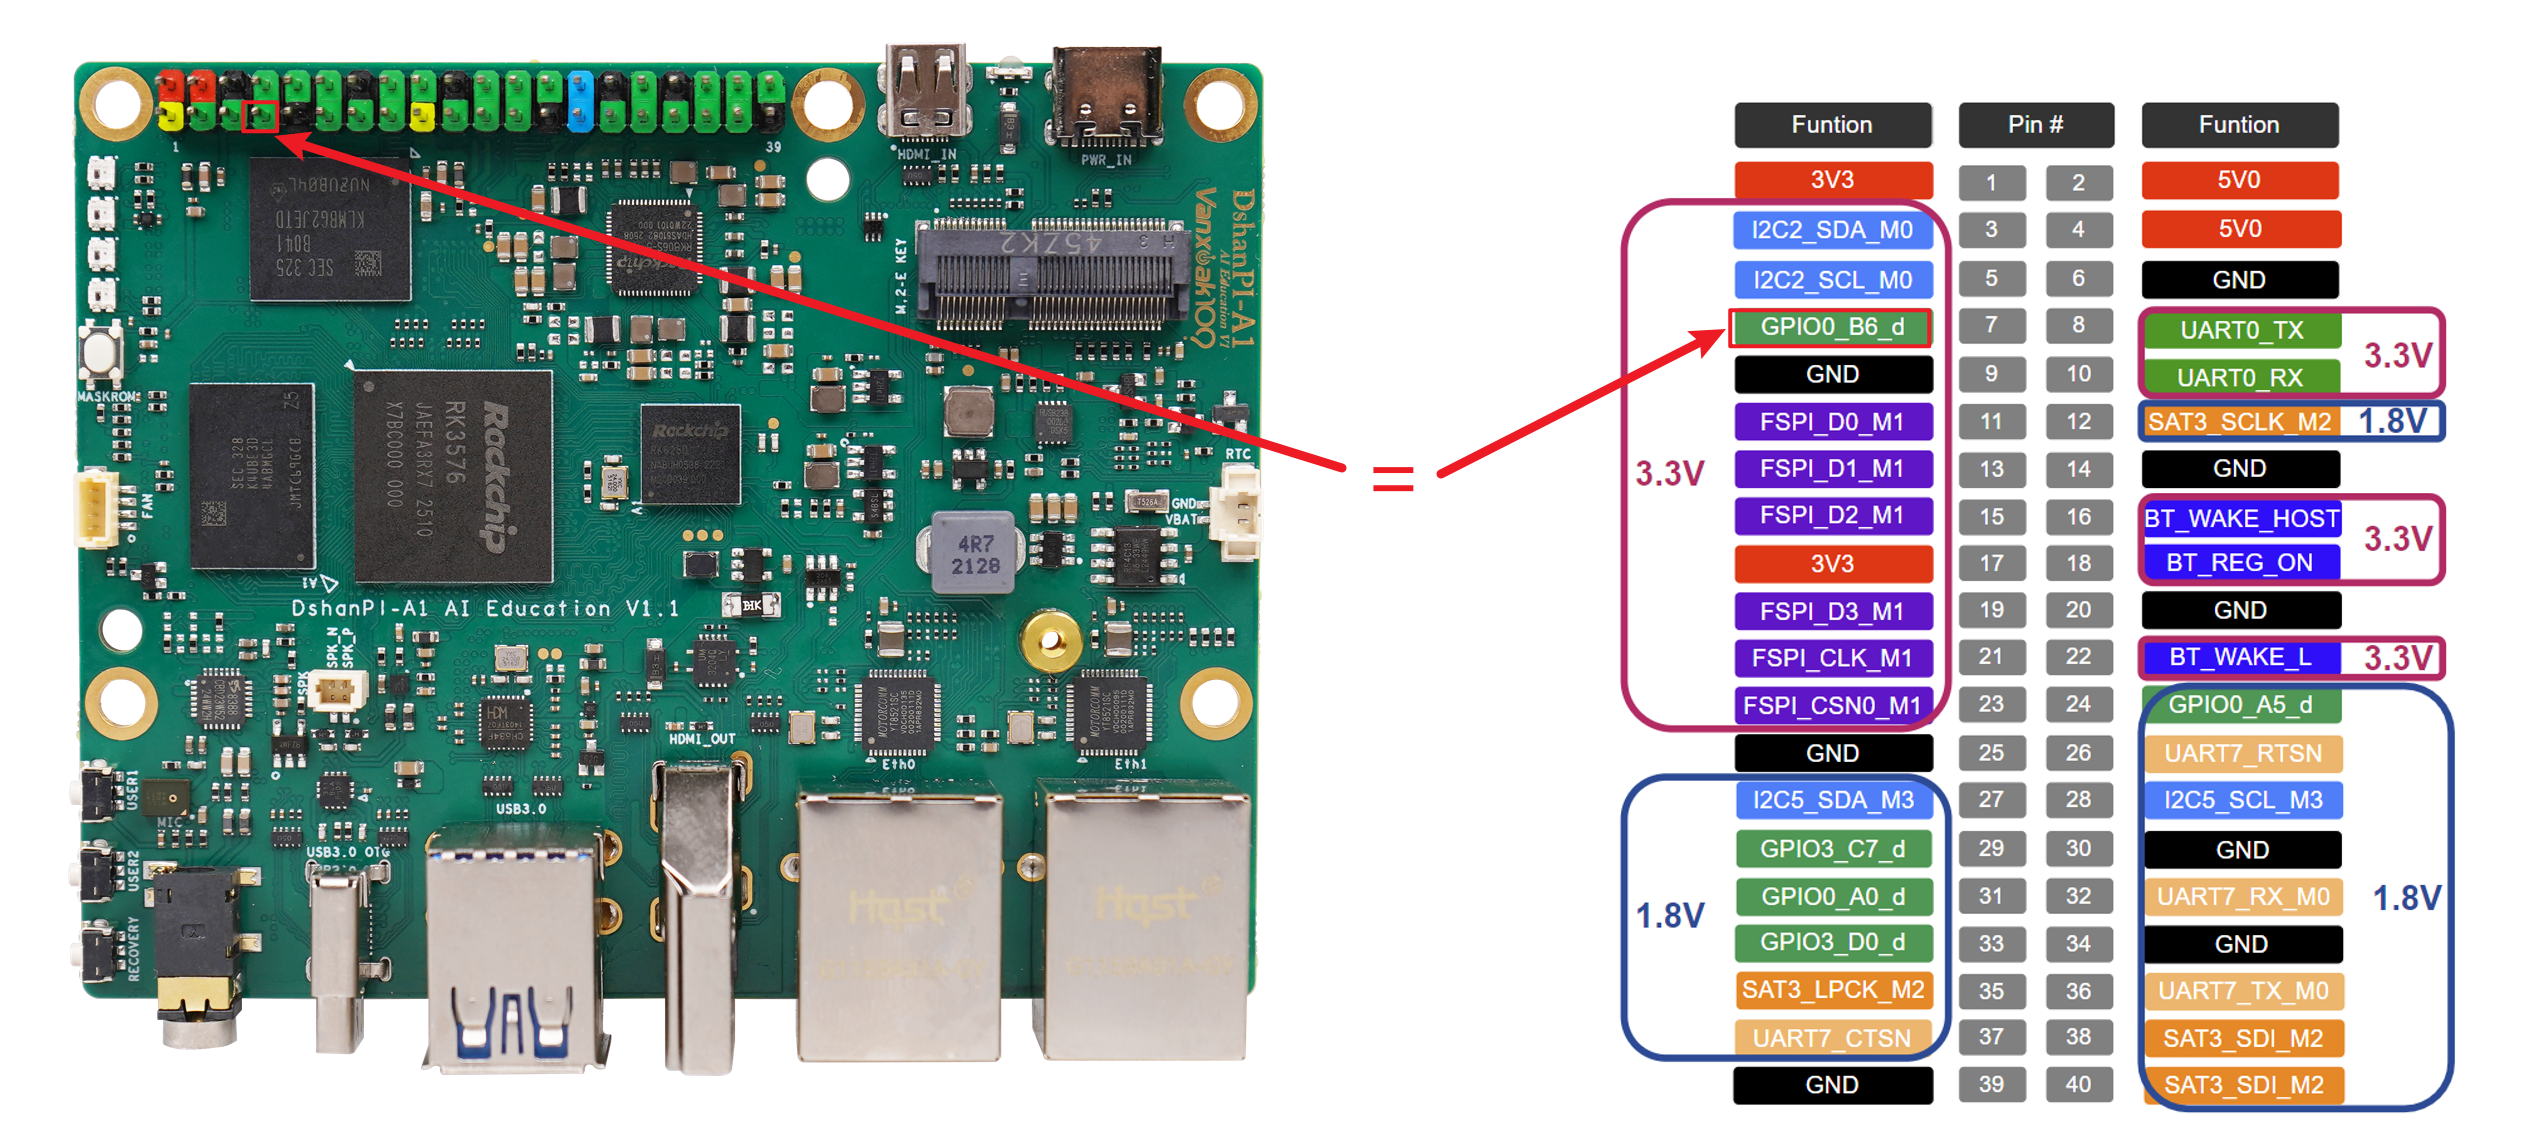
2.引脚分布
在板子上拥有40Pin的拓展引脚,你可以通过下图所示的硬件接口图进行确定,更多详细功能可以通过硬件原理图确定。
注意:如果模块的接收电压是3V3请接入3V3,如果模块的接收电压是1V8请接入1V8。禁止将1V8的模块接入3V3的引脚,会导致模块烧毁!
3.使用GPIO sysfs控制
下面以拓展排针上的GPIO0_B6为例。
1.将GPIO导出到用户空间
#使用root权限
sudo su
#这里以GPIO0_B6为例
echo 14 > /sys/class/gpio/export
导出完成后即可执行以下命令,进入对应gpio的设备目录:
cd /sys/class/gpio/gpio14
对于其他的IO设备,可按照 /sys/class/gpio/gpioN(N=1,2,3,5,...)格式访问。
2.查看目录:
root@dshanpi-a1:/sys/class/gpio/gpio14# ls
active_low  device  direction  edge  power  subsystem  uevent  value
作用如下:
| 名称 | 类型 | 作用说明 |
|---|---|---|
active_low | 文件 | 极性控制。 |
device | 符号链接 | 指向 /sys/devices/... 下的真实设备节点,内核内部用,用户一般不用管。 |
direction | 文件 | 设置引脚方向。 |
edge | 文件 | 中断触发方式(仅输入有效)。 |
power | 目录 | 电源管理属性,通常为空;挂起/唤醒相关,用户很少改。 |
subsystem | 符号链接 | 指向 /sys/class/gpio 自身,方便脚本快速定位。 |
uevent | 文件 | 内核热插拔事件属性,udev 规则用;普通用户无需操作。 |
value | 文件 | 读写引脚电平。 |
3.控制GPIO引脚
1.设置GPIO的方向,选择方向指南(二选一)
# 设置 GPIO 为输入
echo in > direction
# 设置 GPIO 为输出
echo out > direction
2.控制GPIO电平
# 获取引脚输入
cat value
# 设置引脚输出
echo 1 > value
echo 0 > value
注意:如果是1V8的引脚高电平为1V8,如果是3V3的引脚高电平为3V3。
运行完成后取消占用,可执行
echo 14 > /sys/class/gpio/unexport
4.使用Python程序控制
安装python3 libgpiod库
sudo apt update
sudo apt install python3-libgpiod
4.1 输出控制示例
#!/usr/bin/env python3
import gpiod
import time

CHIP_NAME   = "gpio0"     # /dev/gpiochip0
LINE_OFFSET = 14          # GPIO0_B6

chip = gpiod.Chip(CHIP_NAME)
line = chip.get_line(LINE_OFFSET)

# 申请为输出,默认低电平
line.request(consumer="rk3576-gpio", type=gpiod.LINE_REQ_DIR_OUT, default_vals=[0])

try:
    while True:
        line.set_value(1)
        time.sleep(0.5)
        line.set_value(0)
        time.sleep(0.5)
except KeyboardInterrupt:
    pass
finally:
    line.release()
运行方式:
sudo python gpio-out.py
运行效果:可使用万用表测量GPIO0_B6,可观察到其电压值在0和3.3V之间循环。
4.2 输入控制示例
#!/usr/bin/env python3
import gpiod
import time
# gpio0 芯片
chip = gpiod.Chip("gpio0")
# 输出脚��:GPIO0_B6 (offset 14)
led = chip.get_line(14)
# 输入脚:GPIO0_A0 (offset 0)
btn = chip.get_line(0)
# 申请输出,默认高
led.request(consumer="led",
type=gpiod.LINE_REQ_DIR_OUT,
default_vals=[1])
# 申请输入,启用下降沿中断
btn.request(consumer="btn",
type=gpiod.LINE_REQ_EV_FALLING_EDGE)
print("上电:GPIO0_B6 = 高")
print("按下 GPIO0_A0 后:GPIO0_B6 拉低,松开恢复高")
print("Ctrl+C 退出")
try:
while True:
ev = btn.event_wait(sec=1) # 阻塞等 1 秒
if ev and btn.event_read().event_type == gpiod.LineEvent.FALLING_EDGE:
led.set_value(0) # 按下 -> 低
print("按键按下 → GPIO0_B6 = 低")
# 简单消抖:等待按钮松开
while btn.get_value() == 0:
time.sleep(0.01)
led.set_value(1) # 松开 -> 高
print("按键松开 → GPIO0_B6 = 高")
except KeyboardInterrupt:
pass
finally:
led.release()
btn.release()
运行方式:
sudo python3 gpio-in.py
运行效果:默认GPIO0_B6为高电平,当您按下用户按键USER1时会变为低电平。
baiwen@dshanpi-a1:~$ sudo python3 gpio-in.py
扩展排针 GPIO0_B6 默认为高
按下 GPIO0_A0 时 GPIO0_B6 拉低,松开恢复高
Ctrl+C 退出
按键按下 → GPIO0_B6 = 低
按键松开 → GPIO0_B6 = 高
按键按下 → GPIO0_B6 = 低
按键松开 → GPIO0_B6 = 高
按键按下 → GPIO0_B6 = 低
按键松开 → GPIO0_B6 = 高
按键按下 → GPIO0_B6 = 低
按键松开 → GPIO0_B6 = 高
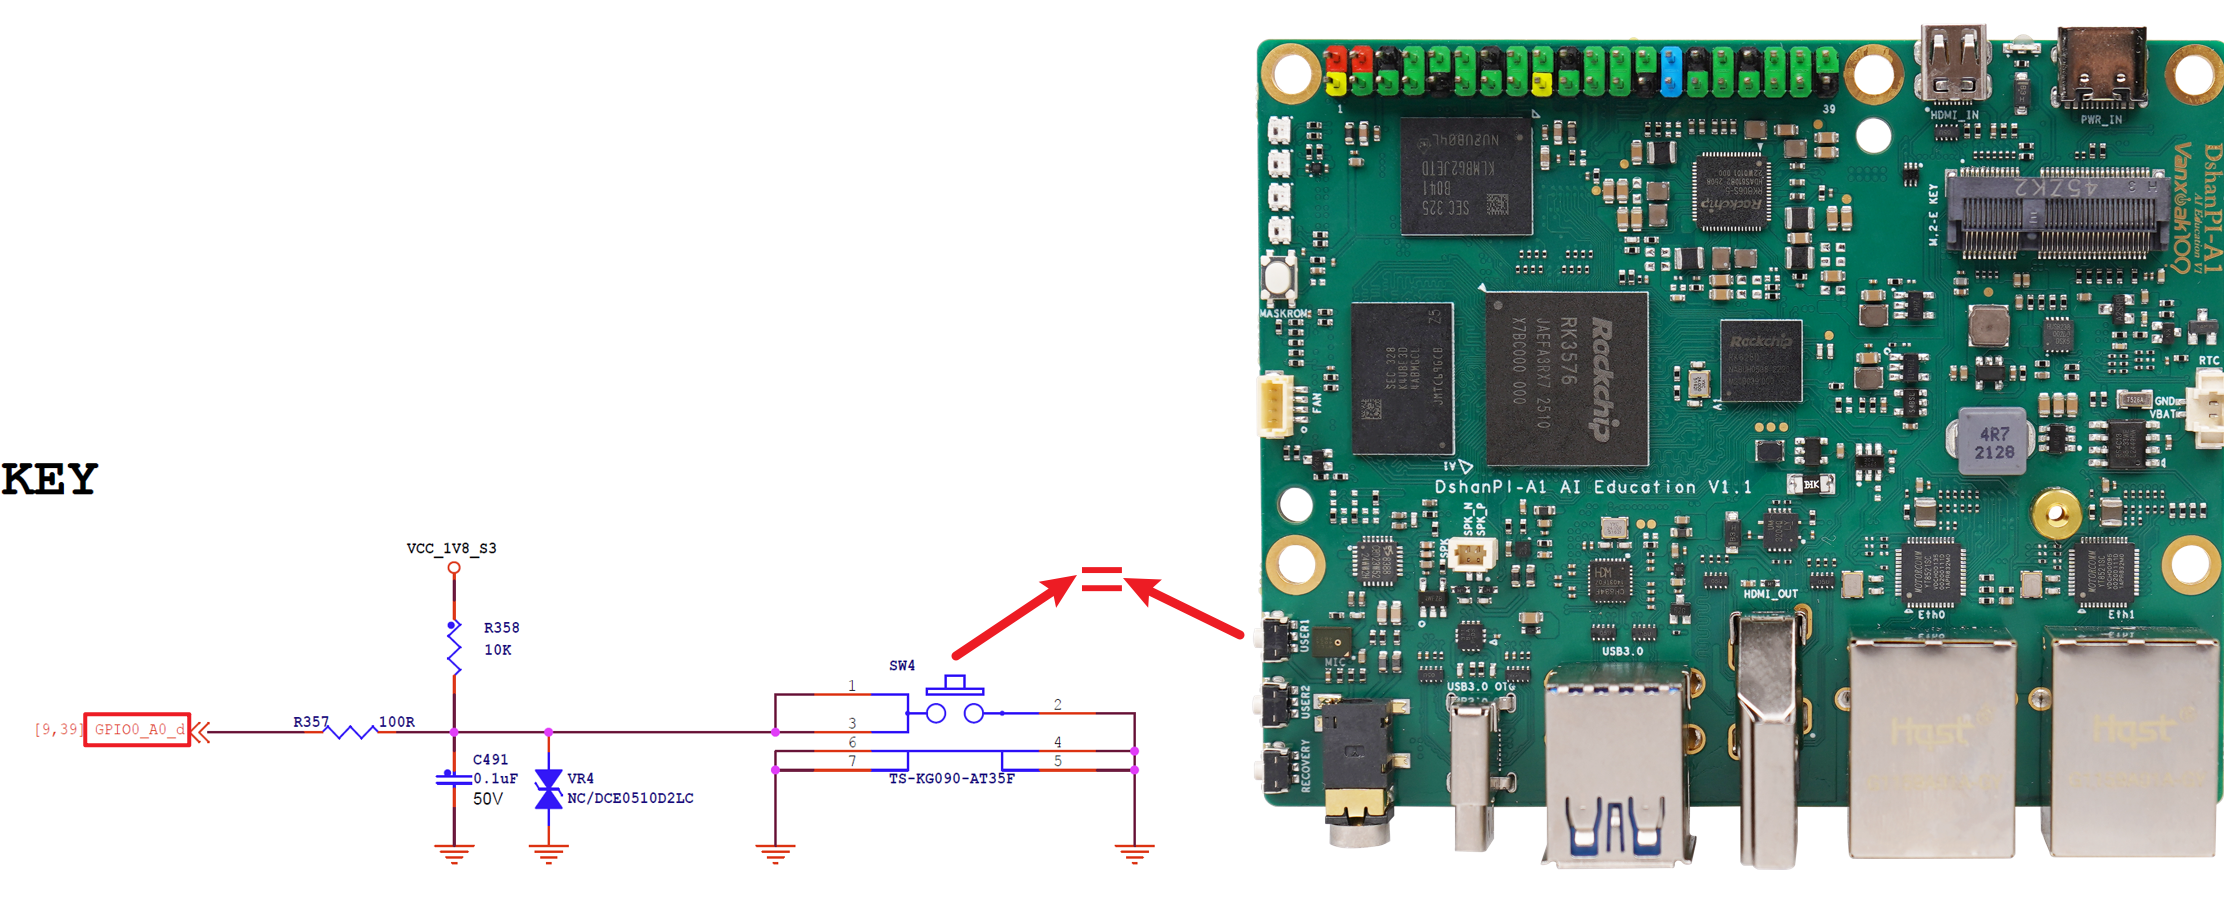
按键位置如下图所示:
5.使用C语言控制
安装c libgpiod库
sudo apt update
sudo apt install libgpiod-dev gpiod
5.1 输出控制示例
GPIO的高低电平循环示例:
#include <gpiod.h>
#include <stdio.h>
#include <unistd.h>
#include <signal.h>

static volatile int running = 1;
void handle_sig(int sig) { running = 0; }

int main(void)
{
    const char *chip_name = "gpiochip0";
    const unsigned int line_offset = 14;   /* GPIO0_B6 */

    struct gpiod_chip *chip;
    struct gpiod_line *line;

    chip = gpiod_chip_open_by_name(chip_name);
    if (!chip) { perror("open chip"); return 1; }

    line = gpiod_chip_get_line(chip, line_offset);
    if (!line) { perror("get line"); gpiod_chip_close(chip); return 1; }

    /* 申请输出,默认低电平 */
    if (gpiod_line_request_output(line, "rk3576-gpio", 0) < 0) {
        perror("request output"); gpiod_chip_close(chip); return 1;
    }

    signal(SIGINT, handle_sig);   /* Ctrl+C 退出 */

    while (running) {
        gpiod_line_set_value(line, 1);
        usleep(500000);       /* 0.5 s */
        gpiod_line_set_value(line, 0);
        usleep(500000);
    }

    gpiod_line_release(line);
    gpiod_chip_close(chip);
    puts("\n结束");
    return 0;
}
编译程序
gcc gpio-out.c -o gpio-out -lgpiod
运行:
sudo ./gpio-out
运行效果:可使用万用表测量GPIO0_B6,可观察到其电压值在0和3.3V之间循环。
5.2 输入控制示例
#include <gpiod.h>
#include <stdio.h>
#include <unistd.h>
#include <signal.h>
#include <stdbool.h>

static volatile sig_atomic_t running = 1;
void sig_handler(int sig) { running = 0; }

int main(void)
{
    const char *chip_name = "gpiochip0";
    const unsigned int ext_offset = 14;   /* GPIO0_B6 扩展排针 */
    const unsigned int key_offset = 0;    /* GPIO0_A0 按键 */

    struct gpiod_chip *chip;
    struct gpiod_line *ext, *key;

    /* 捕获 Ctrl+C */
    signal(SIGINT, sig_handler);

    /* 打开 gpiochip0 */
    chip = gpiod_chip_open_by_name(chip_name);
    if (!chip) { perror("open chip"); return 1; }

    /* 排针:输出,默认高 */
    ext = gpiod_chip_get_line(chip, ext_offset);
    if (!ext || gpiod_line_request_output(ext, "ext_pin", 1) < 0) {
        perror("request ext"); gpiod_chip_close(chip); return 1;
    }

    /* 按键:输入,下降沿中断 */
    key = gpiod_chip_get_line(chip, key_offset);
    if (!key || gpiod_line_request_falling_edge_events(key, "btn") < 0) {
        perror("request key"); gpiod_chip_close(chip); return 1;
    }

    puts("扩展排针 GPIO0_B6 默认为高");
    puts("按下 GPIO0_A0 时 GPIO0_B6 拉低,松开恢复高");
    puts("Ctrl+C 退出");

    while (running) {
        if (gpiod_line_event_wait(key, NULL) == 0) {   /* 等到下降沿 */
            struct gpiod_line_event ev;
            gpiod_line_event_read(key, &ev);           /* 清事件 */

            gpiod_line_set_value(ext, 0);              /* 拉低 */
            puts("按键按下 → GPIO0_B6 = 低");

            /* 等待松开(防抖) */
            while (gpiod_line_get_value(key) == 0 && running)
                usleep(10000);                         /* 10 ms */

            gpiod_line_set_value(ext, 1);              /* 恢复高 */
            puts("按键松开 → GPIO0_B6 = 高");
        }
    }

    /* 释放资源 */
    gpiod_line_release(ext);
    gpiod_line_release(key);
    gpiod_chip_close(chip);
    puts("结束");
    return 0;
}
编译程序
gcc gpio-in.c -o gpio-in -lgpiod
运行:
sudo ./gpio-in
运行效果:默认GPIO0_B6为高电平,当您按下用户按键USER1时会变为低电平。
baiwen@dshanpi-a1:~$ sudo ./gpio-in
扩展排针 GPIO0_B6 默认为高
按下 GPIO0_A0 时 GPIO0_B6 拉低,松开恢复高
Ctrl+C 退出
按键按下 → GPIO0_B6 = 低
按键松开 → GPIO0_B6 = 高
按键按下 → GPIO0_B6 = 低
按键松开 → GPIO0_B6 = 高
按键按下 → GPIO0_B6 = 低
按键松开 → GPIO0_B6 = 高
按键位置如下图所示: