人脸检测模型部署
参考资料:
- 人脸模型仓库:https://github.com/biubug6/Pytorch_Retinaface
- 人脸检测资料包(国内用户推荐):https://dl.100ask.net/Hardware/MPU/RK3576-DshanPi-A1/utils/Pytorch_Retinaface.zip
1.获取原始模型
1.获取源码仓库
git clone https://github.com/biubug6/Pytorch_Retinaface.git
2.创建并激活 conda 环境
conda create -n retinaface python=3.9 -y
conda activate retinaface
3.安装 PyTorch与其他依赖
conda install compilers cmake
pip3 install torch torchvision
pip3 install opencv-python pillow matplotlib numpy tensorboard
pip3 install onnx onnxruntime onnxsim
4.获取预训练权重
cd Pytorch_Retinaface
#新建权重文件夹
mkdir -p weights
下载预训练权重模型和预训练模型,保存至weights目录下。
5.修改convert_to_onnx.py源码中的torch.onnx._export为torch.onnx.export,修改完成如下:
torch_out = torch.onnx.export(net, inputs, output_onnx, export_params=True, verbose=False,
                                   input_names=input_names, output_names=output_names)
6.权重文件转换ONNX模型
python convert_to_onnx.py
转换完成后,可以在当前目录下看到FaceDetector.onnx模型文件。
(retinaface) baiwen@dshanpi-a1:~/Pytorch_Retinaface$ ls
convert_to_onnx.py  data       FaceDetector.onnx  LICENSE.MIT  README.md     test_widerface.py  utils    widerface_evaluate
curve               detect.py  layers             models       test_fddb.py  train.py           weights
7.简化模型
python -m onnxsim FaceDetector.onnx retinaface-sim.onnx --input-shape 1,3,640,640
运行效果如下:
(retinaface) baiwen@dshanpi-a1:~/Pytorch_Retinaface$ python -m onnxsim FaceDetector.onnx retinaface-sim.onnx --input-shape 1,3,640,640
WARNING: "--input-shape" is renamed to "--overwrite-input-shape". Please use it instead.
Simplifying...
Finish! Here is the difference:
┏━━━━━━━━━━━━┳━━━━━━━━━━━━━━━━┳━━━━━━━━━━━━━━━━━━┓
┃            ┃ Original Model ┃ Simplified Model ┃
┡━━━━━━━━━━━━╇━━━━━━━━━━━━━━━━╇━━━━━━━━━━━━━━━━━━┩
│ Add        │ 2              │ 2                │
│ Concat     │ 14             │ 6                │
│ Constant   │ 147            │ 117              │
│ Conv       │ 56             │ 56               │
│ Gather     │ 6              │ 0                │
│ LeakyRelu  │ 38             │ 38               │
│ Relu       │ 3              │ 3                │
│ Reshape    │ 9              │ 9                │
│ Resize     │ 2              │ 2                │
│ Shape      │ 8              │ 0                │
│ Slice      │ 2              │ 0                │
│ Softmax    │ 1              │ 1                │
│ Transpose  │ 9              │ 9                │
│ Unsqueeze  │ 6              │ 0                │
│ Model Size │ 1.6MiB         │ 1.7MiB           │
└────────────┴────────────────┴──────────────────┘
简化完成后将retinaface-sim.onnx拷贝至RetinaFace工作目录的模型路径下:
cp retinaface-sim.onnx ~/Projects/rknn_model_zoo/examples/RetinaFace/model
2.模型转换
1.使用Conda激活rknn-toolkit2环境
conda activate rknn-toolkit2
2.进入RetinaFace模型转换目录
cd ~/Projects/rknn_model_zoo/examples/RetinaFace/python
3.执行模型转换
python3 convert.py ../model/retinaface-sim.onnx rk3576
运行效果如下:
(rknn-toolkit2) baiwen@dshanpi-a1:~/Projects/rknn_model_zoo/examples/RetinaFace/python$ python3 convert.py ../model/retinaface-sim.onnx rk3576
I rknn-toolkit2 version: 2.3.2
--> Config model
done
--> Loading model
I Loading : 100%|██████████████████████████████████████████████| 117/117 [00:00<00:00, 11380.65it/s]
done
--> Building model
I OpFusing 0: 100%|██████████████████████████████████████████████| 100/100 [00:00<00:00, 297.57it/s]
I OpFusing 1 : 100%|█████████████████████████████████████████████| 100/100 [00:00<00:00, 104.34it/s]
I OpFusing 0 : 100%|██████████████████████████████████████████████| 100/100 [00:02<00:00, 46.89it/s]
I OpFusing 1 : 100%|██████████████████████████████████████████████| 100/100 [00:02<00:00, 44.28it/s]
I OpFusing 2 : 100%|██████████████████████████████████████████████| 100/100 [00:03<00:00, 32.20it/s]
W build: found outlier value, this may affect quantization accuracy
                        const name          abs_mean    abs_std     outlier value
                        onnx::Conv_634      0.69        0.83        21.961
I GraphPreparing : 100%|█████████████████████████████████████████| 123/123 [00:00<00:00, 882.71it/s]
I Quantizating : 100%|███████████████████████████████████████████| 123/123 [00:00<00:00, 152.58it/s]
I OpFusing 0: 100%|██████████████████████████████████████████████| 100/100 [00:00<00:00, 448.58it/s]
I OpFusing 1 : 100%|█████████████████████████████████████████████| 100/100 [00:00<00:00, 433.87it/s]
I OpFusing 2 : 100%|█████████████████████████████████████████████| 100/100 [00:00<00:00, 424.22it/s]
W build: The default input dtype of 'input0' is changed from 'float32' to 'int8' in rknn model for performance!
                       Please take care of this change when deploy rknn model with Runtime API!
W build: The default output dtype of 'output0' is changed from 'float32' to 'int8' in rknn model for performance!
                      Please take care of this change when deploy rknn model with Runtime API!
W build: The default output dtype of '592' is changed from 'float32' to 'int8' in rknn model for performance!
                      Please take care of this change when deploy rknn model with Runtime API!
I rknn building ...
I rknn building done.
done
--> Export rknn model
done
(rknn-toolkit2) baiwen@dshanpi-a1:~/Projects/rknn_model_zoo/examples/RetinaFace/python$ ls ../model/
dataset.txt  download_model.sh  RetinaFace.rknn  retinaface-sim.onnx  test.jpg
运行完成后可以在../model/目录下可以看到转换完成后的端侧推理模型RetinaFace.rknn。
3.模型推理
1.修改代码支持640*640的模型输入,
vi RetinaFace.py
找到166行左右,将原来的模型宽高代码修改为640,下面为原始代码:
model_height, model_width = (320, 320)
修改为:
model_height, model_width = (640, 640)
2.执行推理测试代码:
python3 RetinaFace.py --model_path ../model/RetinaFace.rknn --target rk3576
运行效果如下:
(rknn-toolkit2) baiwen@dshanpi-a1:~/Projects/rknn_model_zoo/examples/RetinaFace/python$ python3 RetinaFace.py --model_path ../model/RetinaFace.rknn --target rk3576
I rknn-toolkit2 version: 2.3.2
done
--> Init runtime environment
I target set by user is: rk3576
done
--> Running model
W inference: The 'data_format' is not set, and its default value is 'nhwc'!
image_size: (640, 640) num_priors= 16800
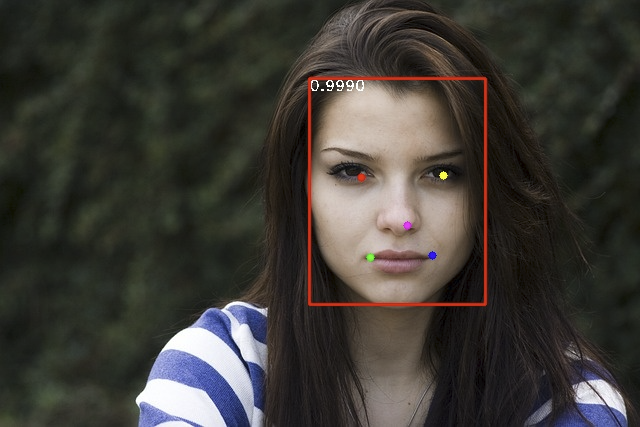
face @ (309 78 485 304) 0.999023
save image in ./result.jpg
可以看到运行完成后会保存结果图像result.jpg在当前目录下。
4.视频流推理
开始前请注意,请务必接入USB摄像头,并确认/dev/目录下存在video0设备节点!!!
1.新建程序文件RetinaFace_video.py,填入一下内容:
import os
import sys
import urllib
import urllib.request
import time
import numpy as np
import argparse
import cv2
from math import ceil
from itertools import product as product

from rknn.api import RKNN

def letterbox_resize(image, size, bg_color):
    """
    letterbox_resize the image according to the specified size
    :param image: input image, which can be a NumPy array or file path
    :param size: target size (width, height)
    :param bg_color: background filling data
    :return: processed image
    """
    if isinstance(image, str):
        image = cv2.imread(image)

    target_width, target_height = size
    image_height, image_width, _ = image.shape

    # Calculate the adjusted image size
    aspect_ratio = min(target_width / image_width, target_height / image_height)
    new_width = int(image_width * aspect_ratio)
    new_height = int(image_height * aspect_ratio)

    # Use cv2.resize() for proportional scaling
    image = cv2.resize(image, (new_width, new_height), interpolation=cv2.INTER_AREA)

    # Create a new canvas and fill it
    result_image = np.ones((target_height, target_width, 3), dtype=np.uint8) * bg_color
    offset_x = (target_width - new_width) // 2
    offset_y = (target_height - new_height) // 2
    result_image[offset_y:offset_y + new_height, offset_x:offset_x + new_width] = image
    return result_image, aspect_ratio, offset_x, offset_y

def PriorBox(image_size): #image_size Support (320,320) and (640,640)
    anchors = []
    min_sizes = [[16, 32], [64, 128], [256, 512]]
    steps = [8, 16, 32]
    feature_maps = [[ceil(image_size[0] / step), ceil(image_size[1] / step)] for step in steps]
    for k, f in enumerate(feature_maps):
        min_sizes_ = min_sizes[k]
        for i, j in product(range(f[0]), range(f[1])):
            for min_size in min_sizes_:
                s_kx = min_size / image_size[1]
                s_ky = min_size / image_size[0]
                dense_cx = [x * steps[k] / image_size[1] for x in [j + 0.5]]
                dense_cy = [y * steps[k] / image_size[0] for y in [i + 0.5]]
                for cy, cx in product(dense_cy, dense_cx):
                    anchors += [cx, cy, s_kx, s_ky]
    output = np.array(anchors).reshape(-1, 4)
    print("image_size:",image_size," num_priors=",output.shape[0])
    return output

def box_decode(loc, priors):
    """Decode locations from predictions using priors to undo
    the encoding we did for offset regression at train time.
    Args:
        loc (tensor): location predictions for loc layers,
            Shape: [num_priors,4]
        priors (tensor): Prior boxes in center-offset form.
            Shape: [num_priors,4].
        variances: (list[float]) Variances of priorboxes
    Return:
        decoded bounding box predictions
    """
    variances = [0.1, 0.2]
    boxes = np.concatenate((
        priors[:, :2] + loc[:, :2] * variances[0] * priors[:, 2:],
        priors[:, 2:] * np.exp(loc[:, 2:] * variances[1])), axis=1)
    boxes[:, :2] -= boxes[:, 2:] / 2
    boxes[:, 2:] += boxes[:, :2]
    return boxes

def decode_landm(pre, priors):
    """Decode landm from predictions using priors to undo
    the encoding we did for offset regression at train time.
    Args:
        pre (tensor): landm predictions for loc layers,
            Shape: [num_priors,10]
        priors (tensor): Prior boxes in center-offset form.
            Shape: [num_priors,4].
        variances: (list[float]) Variances of priorboxes
    Return:
        decoded landm predictions
    """
    variances = [0.1, 0.2]
    landmarks = np.concatenate((
        priors[:, :2] + pre[:, :2] * variances[0] * priors[:, 2:],
        priors[:, :2] + pre[:, 2:4] * variances[0] * priors[:, 2:],
        priors[:, :2] + pre[:, 4:6] * variances[0] * priors[:, 2:],
        priors[:, :2] + pre[:, 6:8] * variances[0] * priors[:, 2:],
        priors[:, :2] + pre[:, 8:10] * variances[0] * priors[:, 2:]
    ), axis=1)
    return landmarks

def nms(dets, thresh):
    """Pure Python NMS baseline."""
    x1 = dets[:, 0]
    y1 = dets[:, 1]
    x2 = dets[:, 2]
    y2 = dets[:, 3]
    scores = dets[:, 4]

    areas = (x2 - x1 + 1) * (y2 - y1 + 1)
    order = scores.argsort()[::-1]

    keep = []
    while order.size > 0:
        i = order[0]
        keep.append(i)
        xx1 = np.maximum(x1[i], x1[order[1:]])
        yy1 = np.maximum(y1[i], y1[order[1:]])
        xx2 = np.minimum(x2[i], x2[order[1:]])
        yy2 = np.minimum(y2[i], y2[order[1:]])

        w = np.maximum(0.0, xx2 - xx1 + 1)
        h = np.maximum(0.0, yy2 - yy1 + 1)
        inter = w * h
        ovr = inter / (areas[i] + areas[order[1:]] - inter)

        inds = np.where(ovr <= thresh)[0]
        order = order[inds + 1]

    return keep

if __name__ == '__main__':
    parser = argparse.ArgumentParser(description='RetinaFace Real-time Camera Demo', add_help=True)
    parser.add_argument('--model_path', type=str, required=True,
                        help='model path, could be .rknn file')
    parser.add_argument('--target', type=str,
                        default='rk3576', help='target RKNPU platform')
    parser.add_argument('--device_id', type=str,
                        default=None, help='device id')
    args = parser.parse_args()

    # 1. 加载 RKNN 模型
    rknn = RKNN(verbose=False)
    rknn.load_rknn(args.model_path)
    rknn.init_runtime(target=args.target)
    print('Model & runtime ready.')

    # 2. 打开摄像头
    cap = cv2.VideoCapture(0)          # /dev/video0
    if not cap.isOpened():
        print('Cannot open camera.')
        exit(-1)

    model_height, model_width = 640, 640
    priors = PriorBox(image_size=(model_height, model_width))

    while True:
        ret, frame = cap.read()
        if not ret:
            break

        img_height, img_width = frame.shape[:2]

        # 3. 预处理(letterbox + RGB)
        letterbox_img, aspect_ratio, offset_x, offset_y = letterbox_resize(
            frame, (model_height, model_width), 114)
        infer_img = letterbox_img[..., ::-1]          # BGR→RGB
        infer_img = infer_img.astype(np.float32)

        # 4. RKNN 推理
        loc, conf, landmarks = rknn.inference(inputs=[infer_img])

        # 5. 后处理
        boxes = box_decode(loc.squeeze(0), priors)
        scale = np.array([model_width, model_height,
                          model_width, model_height])
        boxes = boxes * scale
        boxes[..., 0::2] = np.clip((boxes[..., 0::2] - offset_x) / aspect_ratio, 0, img_width)
        boxes[..., 1::2] = np.clip((boxes[..., 1::2] - offset_y) / aspect_ratio, 0, img_height)

        scores = conf.squeeze(0)[:, 1]
        landmarks = decode_landm(landmarks.squeeze(0), priors)
        scale_lm = np.array([model_width, model_height] * 5)
        landmarks = landmarks * scale_lm
        landmarks[..., 0::2] = np.clip((landmarks[..., 0::2] - offset_x) / aspect_ratio, 0, img_width)
        landmarks[..., 1::2] = np.clip((landmarks[..., 1::2] - offset_y) / aspect_ratio, 0, img_height)

        inds = np.where(scores > 0.4)[0]         # 阈值可调
        dets = np.hstack((boxes[inds], scores[inds, np.newaxis])).astype(np.float32)
        keep = nms(dets, 0.5)
        dets = dets[keep]
        landmarks = landmarks[inds][keep]

        # 6. 画框画点
        for det in dets:
            x1, y1, x2, y2 = det[:4].astype(int)
            score = det[4]
            cv2.rectangle(frame, (x1, y1), (x2, y2), (0, 0, 255), 2)
            cv2.putText(frame, f'{score:.2f}', (x1, y1 - 5),
                        cv2.FONT_HERSHEY_SIMPLEX, 0.5, (0, 255, 0), 1)
        for lm in landmarks:
            for k in range(5):
                cv2.circle(frame, (int(lm[2*k]), int(lm[2*k+1])), 2, (0, 255, 255), -1)

        # 7. 实时显示
        cv2.imshow('RetinaFace Real-time', frame)
        if cv2.waitKey(1) & 0xFF == ord('q'):
            break

    # 8. 清理
    cap.release()
    cv2.destroyAllWindows()
    rknn.release()
2.运行视频流推理
python3 RetinaFace_video.py --model_path ../model/RetinaFace.rknn --target rk3576