14_使用GPIO操作I2C设备_IMX6ULL
使用GPIO操作I2C设备_IMX6ULL
参考资料:
- i2c_spec.pdf
- Linux文档
Linux-5.4/Documentation/devicetree/bindings/i2c/i2c-gpio.yamlLinux-4.9.88/Documentation/devicetree/bindings/i2c/i2c-gpio.txt
- Linux驱动源码
Linux-5.4/drivers/i2c/busses/i2c-gpio.cLinux-4.9.88/drivers/i2c/busses/i2c-gpio.c
- 扩展板原理图:
imx6ull_extend_v10.pdf - 本节对应的代码:
doc_and_source_for_drivers/IMX6ULL/source/04_I2C/07_i2c_gpio_dts_imx6ull
1. 硬件连接
- IMX6ULL:把I2C模块接到GPIO
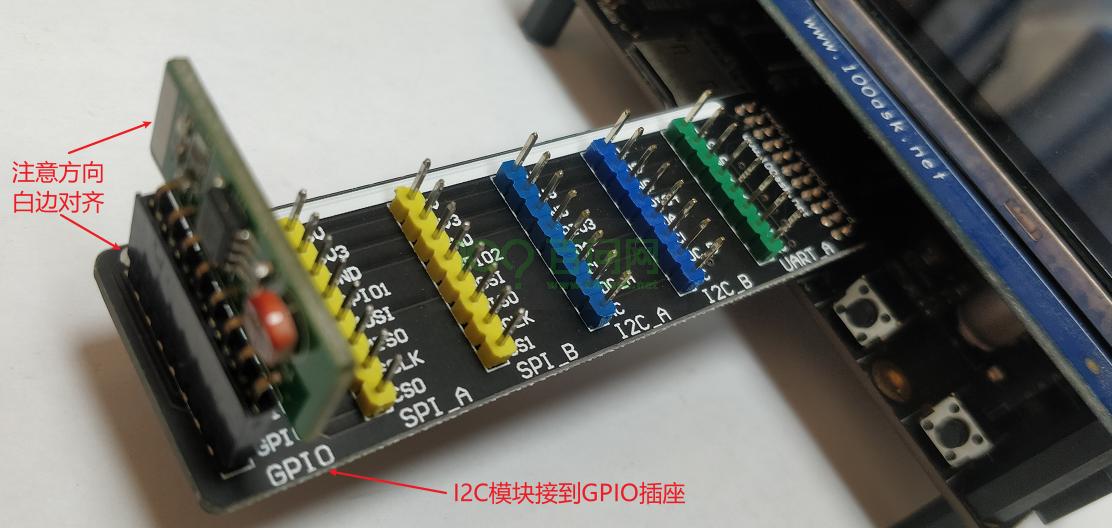
2. 根据原理图编写设备树
2.1 原理图
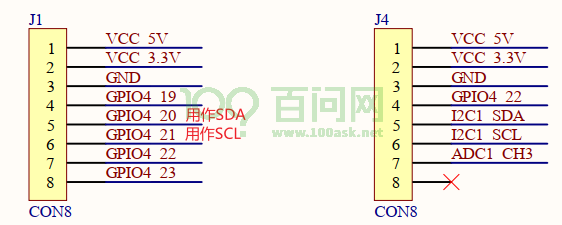
2.2 编写设备树
i2c_gpio_100ask {
	compatible = "i2c-gpio";
	gpios = <&gpio4 20 0 /* sda */
		     &gpio4 21 0 /* scl */
		    >;
	i2c-gpio,delay-us = <5>;	/* ~100 kHz */
	#address-cells = <1>;
	#size-cells = <0>;
};
把上述代码,放入arch/arm/boot/dts/100ask_imx6ull-14x14.dts的根节点下面。
3. 确认内核已经配置了I2C-GPIO
查看内核目录下的.config,如果未设置CONFIG_I2C_GPIO,上机实验时需要配置内核、编译I2C-GPIO驱动。
4. 上机实验
4.1 设置工具链
-
IMX6ULL
export ARCH=armexport CROSS_COMPILE=arm-linux-gnueabihf-export PATH=$PATH:/home/book/100ask_imx6ull-sdk/ToolChain/gcc-linaro-6.2.1-2016.11-x86_64_arm-linux-gnueabihf/bin
4.2 编译、替换设备树
-
编译设备树: 在Ubuntu的IMX6ULL内核目录下执行如下命令, 得到设备树文件:
arch/arm/boot/dts/100ask_imx6ull-14x14.dtbmake dtbs -
复制到NFS目录:
$ cp arch/arm/boot/dts/100ask_imx6ull-14x14.dtb ~/nfs_rootfs/ -
开发板上挂载NFS文件系统
-
vmware使用NAT(假设windowsIP为192.168.1.100)
[root@100ask:~]# mount -t nfs -o nolock,vers=3,port=2049,mountport=9999192.168.1.100:/home/book/nfs_rootfs /mnt -
vmware使用桥接,或者不使用vmware而是直接使用服务器:假设Ubuntu IP为192.168.1.137
[root@100ask:~]# mount -t nfs -o nolock,vers=3 192.168.1.137:/home/book/nfs_rootfs /mnt -
更新设备树
[root@100ask:~]# cp /mnt/100ask_imx6ull-14x14.dtb /boot[root@100ask:~]# sync -
重启开发板
4.3 编译I2C-GPIO驱动
1. 配置内核
在IMX6ULL内核源码目录下执行make menuconfig命令,如下配置内核:
Device Drivers  --->
    I2C support  --->
        I2C Hardware Bus support  --->
            <M> GPIO-based bitbanging I2C      // 输入M,编译为模块
2. 编译模块
设置工具链后,在内核目录下执行:
make modules // 得到 drivers/i2c/busses/i2c-gpio.ko
5. 测试
在开发板上执行:
[root@100ask:~]# i2cdetect -l    // 加载i2c-gpio.ko前只看到2条I2C BUS
i2c-1   i2c             21a4000.i2c                             I2C adapter
i2c-0   i2c             21a0000.i2c                             I2C adapter
[root@100ask:~]#
[root@100ask:~]# insmod /mnt/i2c-gpio.ko
[   45.067602] i2c-gpio i2c_gpio_100ask: using pins 116 (SDA) and 117 (SCL)
[root@100ask:~]# i2cdetect -l     // 加载i2c-gpio.ko后看到3条I2C BUS
i2c-1   i2c             21a4000.i2c                             I2C adapter
i2c-4   i2c             i2c_gpio_100ask                         I2C adapter
i2c-0   i2c             21a0000.i2c                             I2C adapter
[root@100ask:~]#
[root@100ask:~]# i2cdetect -y 4     // 检测到0x50的设备
     0  1  2  3  4  5  6  7  8  9  a  b  c  d  e  f
00:          -- -- -- -- -- -- -- -- -- -- -- -- --
10: -- -- -- -- -- -- -- -- -- -- -- -- -- -- -- --
20: -- -- -- -- -- -- -- -- -- -- -- -- -- -- -- --
30: -- -- -- -- -- -- -- -- -- -- -- -- -- -- -- --
40: -- -- -- -- -- -- -- -- -- -- -- -- -- -- -- --
50: 50 -- -- -- -- -- -- -- -- -- -- -- -- -- -- --
60: -- -- -- -- -- -- -- -- -- -- -- -- -- -- -- --
70: -- -- -- -- -- -- -- --
[root@100ask:~]#
[root@100ask:~]# i2cset -f -y 4 0x50 0 0x55   // 往0地址写入0x55
[root@100ask:~]# i2cget -f -y 4 0x50 0        // 读0地址
0x55